Tuesday, January 24, 2012

Japan Trip 2009 Part 1

It has been my great fortune to have several opportunities to meet and work with many talented persons who explore and preserve traditional crafts.  From working at the Anthony Hay Shop in Colonial Williamsburg, to having a beer with Roy Underhill, to hoping a flight to Japan to spend some time living and working with swordsmith Shoji Yoshihara, I've had some fun.

Japan was probably my most intense experience.  I've traveled internationally before, but never to Asia.  In Europe, it seemed like I could get a feel for parts of the different languages I heard, most share certain words or wood roots, but the Japanese language seemed like white noise to my ears, and when you get off an eleven hour flight, it's mid-night at Narita Airport and you're alone, you realize pretty quickly that you aren't in Iowa anymore . . .

Luckily all I had to do was take a shuttle bus to my hotel and English is the international language of tourism, so my first few hours in Japan weren't so daunting.  The whole trip had been arranged by one of my uncles who spent a lot of time in Japan on business.  His contacts there had helped arrange the trip and even gave me a ride up to Yoshihara's shop. 

Left to right: Yoshihara-san, me, Yazu (Yoshihara's apprentice)
Yoshihara's shop complex was a hour north of Tokyo set in the middle of a lettuce field.  There was the shop, a storage building for charcoal and rice straw, and a small house.  His primary residence is in Tokyo and he only went there once a month to do the heavy forging.  Japanese swordmaking is regulated by the government and consequently the output of all licenced swordmakers is restricted to set quantities.  This measure is intended to keep a high level of quality in the work.  Because he can only make so many blades a month, Yoshihara spends a week up at this shop, where there are no noise restrictions, doing all of the work that requires his large trip hammers.  Once the steel is worked to the proper consistency and forged into a sword blank, he can do the rest of the process at his other shop in Tokyo. 

While Yoshihara worked, I documented the process.  Yazu, Yoshihara's current apprentice squatted near the forge watching Yoshihara work and I sat next to him.  My western legs weren't conditioned to squat for a long time so my hosts provided me with a chair which sat maybe eight inches off the ground.  It wasn't too comfortable either, so I would alternate between squatting and sitting, all the while taking furious notes and pictures.

Prior to this I had spent the summer working with my friend trying to figure out the process.  We read the few books available in English (the most complete of which was written by Yoshihara's brother) and watching youtube videos.  We put an anvil on the floor and stacked firebrick in an old Champion 400 forge to emulate a Japanese style forge.  I cut apart a few old drive shafts and my friend made handles so we could have some Japanese pattern sledge hammers.  We billeted and welded all of the high-carbon scrap that I had been accumulating as we attempted to figure out the process.  I had almost everyone in the shop swinging a hammer -interns, volunteers, employees, everyone was into the project.  The finished billets were worked into paring chisels which I will probably post about later.

Squatting next to Yoshihara's forge, watching the real deal was amazing.  Much of our hard work was vindicated.  Things we had figured out and even some things we had guessed at were confirmed.  But there was so much more too, and I remember thinking that I should have spent some time conditioning my writing hand in preparation for this trip -I couldn't take notes fast enough!

More to come in Part 2

Tenon Saws

Here are pictures from my latest tenon saws.  For one I was working with a really old pattern, not only the rounded cheeks that I like so much, but with a style of fasteners predating the brass split nuts.

Left side

Right side -  castellated style of nuts
I replicated the castellated style of nuts used on a few of the early to mid 1700 saws that exist in several museum's collections.  I couldn't bring myself to peen the rivet end into place, so I did an experiment with fine threads.  Looking through my books I am aware of three saws that have this style.  The White saw in the collections of the Stanley-Whitman House; a William Smith pictured in Tools for Working Wood In Eighteenth Century America, by Jay Gaynor; and this one pictured in Classic Hand Tools, by Garrett Hack.
White Tenon Saw
William Smith (1718-1750) replacement handle

Hack
The rivets on the saw from Hack's book are hard to see, but they are definitely square.   They may or may not have the decorative filings that appear on the Smith saw (I also have it on very good authority that the White saw has the same style). 
Smith saw rivets close-up
One of these days I'll make a saw and rivet it in place, but in the meantime, I'll stick to the split nuts.
Dad's Christmas present -18in tenon saw

Gaynor, James M., and Nancy L. Hagedorn. Tools: Working Wood in Eighteenth-Century America. Colonial Williamsburg Foundation, 1993.
Hack, Garrett.  Classic Hand Tools.  Newtown, Conn.: Taunton Press, 1999.

Monday, January 23, 2012

Williamsburg

For the summer of 2011 I took a working vacation.  I'd been out of the museum world just long enough to miss parts of it, but don't mistake a sense of altruism for my true motivations -I wanted the chance to work with these guys.
If you've read my "About Me" section you know that my background consists of working with my dad in his machine shop, supervising a museum blacksmith shop, and spending some time living and studying with Japanese swordsmith Shoji Yoshihara.  My real experiences are in metal working, but when I applied to Williamsburg, I stated that I was interested in woodworking.  Truthfully I am interested in both but coinciding with this is my desire to make all of my own tools.  My forge is full of tongs and other tools I've replicated, but my wood shop is not nearly as well equiped.  I went to Williamsburg to work with the guys that use accurate replicas of tools from a period of time when these things were approaching incredible levels of beauty and mechanical excellence.  I wanted to know what was good, and what was bad (any survey of tool history will show you there were always "bumps" in the road of technological evolution) and pick up whatever woodworking tips I could glean in the meantime. 

I don't think I was your typical intern.  Certainly I was a novice to woodworking, but I did know a few things, and that allowed me to jump right into my first project, making the shop a copy of the router from the Seaton Chest.  The master of the shop, Mack Headley, went to one of his many stashes of wood and brought back a section of beech, 6"x6"x72" or so and suggested that it might be better to make two at the same time -it would be better for sticking the ogee into the front if done on a piece two times, and then some, longer than a single.  Resawing that big boy was fun, and I say this in all seriousness, how could you not have fun using a 4tpi rip saw?

My second project was replicating a mitre plane.  I'm aware that there is discussion and even argument in a few circles about the terminology, etymology, and any other epistemological aspect relating to what constitutes a mitre plane and what consitutes a strike block -so here's the definition we worked with: A mitre plan is a bevel up plane bedded at a very low angle 20-22.5 degrees while a stike block is bevel down, and typically bedded at 35-36 degrees.  Both are appropriate for a colonial American shop and the originals for the projects were taken from CW's collections.


The mitre plane I copied was from the Carwright Chest.  The chest is a motley assortment of woodworking tools which may not represent the personal tools of a cabinetmaker, but might be an assemblage of tools bought by someone collecting them piecemeal.  Whatever the reasons for this eccentric collection, it contains some gems like the mitre plane.  The original was made by sawing off one cheek, then probably sawing the bed and abutments.  The cheek was then glued back on and the bed was trued and the blade and wedge fitted.  This unconventional method of construction is probably just another one of those "bumps" in tool history and may or may not have been a "one off" craftsman-made item.  The reproduction I made would not be made with the same method, instead I chiseled, drilled, and floated the bed down.

Next was the strike block, patterned off of a John Green.  While this project was a bit more conventional, it required some tricky work in replicating the tight throat extending upwards for 3/8in or so.  On your standard bench-type planes this design would clog quickly, but remember strike blocks are intended mostly for end grain and generally produce very small shavings.  Having this narrow throat also allows the user to true up the bed several times without opening the mouth too much. 

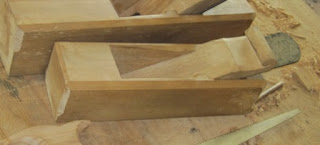
Left to right: Routers, Strike Block, Mitre Plane, Compass Saw
My last few projects were making a few keyhole saw blades with a few different tooth geometries and a copy of a Kenyon compass saw which I ran out of time on. 

Working at the Hay Shop was another great opportunity to spend a few months worth of quality hands-on time with some very talented woodworkers.  Very few places offer people the opportunity to pursue historical trades with such support and encouragement as Colonial Williamsburg does and I am grateful for the chance to be involved in their efforts to understand the tools and methods used by 18th century cabinetmakers.  Thanks again, guys.

Anthony Hay Shop 2011 - Left to Right: Brian Weldy, Ed Wright, Kaare Loftheim, Mack Headley, Sam Cady, Bill Pavlack

Sunday, January 22, 2012

Preview

Now that I have my process fairly streamlined, I want to work on some new designs.  This post will show you what I have in the "R&D" phase. 


Working with that rounded cheek design, putting the handle a bit lower, and experimenting with a fastener design that likely came before the split nuts.  Earlier saws had their handles riveted to the blades.  I'd like to replicate this look, yet still allow the handle to come off without significant alterations having to be made.  One solution seems promising, but I want to do a large amount of field testing before I unleash this on the public. 

Compass saws are something that I think will experience a resurgence in interest some day.  They are useful, but only when you find a good one.  If you prowl antique stores you know that most of the surviving ones are often kinked.  I think this is probably a combination of poor maintenance (not sharpening) and then misuse (exerting too much force with a dull blade).  Traditionally they were made with thicker blades taper ground on two axises and employed no set.  It's hard to do a comparison to see how their manufacture changed over time unless you have a large collection of them.  I do not, and I get funny looks when I take my calipers into antique stores.  However I'm fairly certain that the blade thickness decreased between the eighteenth and twentieth centuries and that manufacturers moved towards setting the teeth; a necessary move, otherwise it would have been very easy to kink such a blade. 

I also want to play around with table saws.  Just from meditating on the subject I have a few notions about why the table saws were just a blip on the radar of saws but I want to test these theories out.  Again I don't have a large body of artifacts to study, so I'm relying on research to help me out.  Ed Lebetkin who runs the the Woodwright Tool Store above the Woodwright School has been very helpful in providing me with measurements and observations about the ones that he has in inventory.  The details of Ed's observations are pretty interesting, but that will all come out in another post.

Sunday, January 15, 2012

Forge

 
The forge
 I made mention in other sections about my metalworking background.  This post will showcase some of what I have done.  Above is the forge I built for myself after returning from Japan during the winter of 2009-2010.  That winter was especially cold in Iowa and I remember a few nights when I had to wash out my mortar pan in below 0 windchills.
The design of the forge is based on a forge built in the 1890s in a small town a half-hour drive from my home.  The shop ran from the 1890s until one day in 1940 when the owner closed shop, went home, and passed away.  His family kept the doors closed on the shop and when they donated it to the State Historical Society in 1980, it was still just as Mr. Edel had left it the night he closed it up. 
The Edel shop is to blacksmiths what the Dominy shop is to woodworkers.  It is amazing to tour too for there are a great many things that Mr. Edel built for himself, such as his helve-hammer. 
My forge drew upon elements of Edel's forge, and other features that I like in a forge.  It is a bottom draft with a deep trough framed together from 8x8 oak.  The chimney is brick with a stainless steel flue integrated into it so that I can close it and retain heat when the forge is not in use.  Above the ceiling the brick transitions into 12in double wall stainless steel pipe. 
My air delivery system is a post all to itself that will probably come later so for now I'll just put up some more pictures. 

Some of the tongs I made to outfit my shop
It's hard to find good hammers, so I made myself a straight peen 4lb

Also not impressed with most commerical clinker-breakers, so my dad and I made this
Controls for electric blower -top lever controls restrictor and escape valves to regulate air flow, bottom controls selector valve between electric blower and bellows. 
My shop is fairly well outfitted, I also have a propane forge and various other tools.  But I have to say the one thing I used to have but now miss desperately is interns.  You can have all of the swages, dies, and mechanical aids in the world, but nothing is as helpful as an intern trained to be a striker.  When I ran the museum shop I had help most days and in those conditions you realize that your work is much easier and accurate with a second pair of hands.